
So, you’ve heard about this new ‘gravel’ thing everyone’s raving about.
You’re curious. What’s all the fuss? Why’s everyone suddenly swapping skinny tyres for chunky tread and disappearing down bridleways?
Well, you’ve landed in the right place. This is the Roadie Goes Off-Roadie guide – a beginner’s intro to gravel riding.
Let’s be honest – the appeal is real. No cars. No traffic lights. Just you, your bike, and endless tracks waiting to be explored. Did I mention no cars?
Now, while gravel shares some DNA with road cycling – the fitness, the bikes, even the fuelling – in practice, it’s a very different beast. In this article, I’ll walk you through the key differences and everything you need to know to get started as a proper gravel rider.
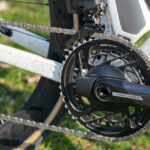
Tyres & Tyre Pressure For Gravel
The first (and arguably biggest) difference between road and gravel? Tyres.
Yes, they look different – more tread, wider casings, all that – but the real shift is in mindset.
If you’ve ever had a mountain biker corner you to talk about tyres, it’s a miracle you made it out alive. But they’re onto something – off-road, tyres matter a lot. There’s tread depth, pattern, compound, casing, width… and that’s before you even think about pressure.
Gravel riding means adapting to terrain and conditions. Dry and dusty? One tyre. Wet and gloopy? Probably another. Once you’ve found the right rubber, tyre pressure becomes the next rabbit hole – and yes, it can be a total minefield.
Want the full deep-dive? Check out our Gravel Tyre Guide for everything you need to know.
Bike Handling For Gravel
The first time your tyres hit gravel, you’ll feel it. It’s looser, less predictable, and suddenly you’re gripping the bars a little tighter. But don’t panic – here are a couple of tips to help you ride smoother, safer, and with more confidence:
1. Ride in the “Ready Position”
When the surface gets rough, being ready for anything is key. That means riding with your cranks level, dominant foot slightly forward, and your weight off the saddle. Stay relaxed, elbows and knees slightly bent – your limbs are your suspension. You’ll be able to absorb bumps, lift your front wheel, even bunny hop over obstacles if needed.
2. Stay Loose
Let the bike move beneath you. Seriously – don’t fight it. Gravel can shift suddenly under your tyres, and trying to muscle through it usually ends in a slide. Stay light on the bike, especially in corners. Shift your weight slightly back, take pressure off the front wheel, and guide the bike around the bend. The looser and more relaxed you are, the smoother you’ll flow.
Stay calm, don’t tense up – and if in doubt, just keep riding. You’ll be a gravel convert in no time.
3. Look where you want to go
Sounds simple, but it’s a game-changer. When things get sketchy, it’s easy to stare straight at that massive rock or rut you don’t want to hit. But here’s the thing – your bike tends to follow your eyes. So instead of fixating on the obstacle, look past it, towards where you actually want to go. Focus on the line, not the hazard. Trust your instincts, and let your body and bike follow. Keep your eyes up, chin level, and commit to the line – it’s surprising how often you glide through stuff that once looked impossible.
Route Mapping
One of the best things about gravel riding is the sense of freedom. You’re not glued to tarmac or stuck dodging cars on main roads — you can dive down bridleways, link up forest tracks, and see where that sketchy-looking trail leads (hopefully not a bog).
But that same freedom means route planning needs a bit more thought than your average road ride. Not all gravel is equal — some paths that look rideable on a map are basically unrideable swamps, and not every dotted line is friendly to bikes. It’s worth using tools like Komoot or RideWithGPS to find routes that other riders have tested, or plotting your own with satellite view and a bit of local knowledge.
Having a GPS computer with proper off-road navigation makes a huge difference. Devices like the Garmin Edge Explore 2 are built for this kind of riding – offering turn-by-turn guidance, re-routing if you go rogue, and even elevation profiles so you know when a hike-a-bike might be coming.
You can totally wing it if that’s your vibe – but if you’re heading deep into the unknown, a bit of prep and a solid GPS can turn a sketchy mission into a proper adventure.
Tools For Your Gravel Ride
When heading off-road, sure, you might escape the cars — but sadly, you can’t escape the mechanicals. Gravel rides can be hard on your bike, and the last thing you want is to be miles from civilisation without the right kit. Don’t worry though — we’ve pulled together a selection of tools and essentials we’d recommend taking on every ride. These aren’t just random picks; they’re small, lightweight, and genuinely useful when things go sideways.
🔧 Silca Italian Army Knife Venti Multi Tool
Silca Italian Multi Tool
This sleek little multi-tool might look minimal, but don’t be fooled — it’s a fully loaded rescue kit for your bike. Made with Silca’s signature precision, it’s got 20 tools packed into a compact format, including hexes, torx, a chain tool, and even a valve core remover. It’s one of those tools you hope you won’t need — but will be eternally grateful for when you do.
⛓ Shimano SM-CN910 Quick Links (12-speed)
Shimano Quick Link – 12 Speed
Snapped chain? Not ideal. These 12-speed quick links from Shimano are a tiny lifesaver. Keep one in your saddlebag and you’ll be back rolling in minutes instead of walking home with your cleats clicking sadly along the gravel.
🔋 Muc-Off AirMach Electric Mini Inflator
Muc-Off AirMach Electric Pump
Manual pumping on the side of a trail? No thanks. This pocket-sized electric inflator from Muc-Off does the hard work for you. Compatible with Presta and Schrader valves, it’s rechargeable via USB-C and delivers precise pressure — perfect if you’ve been playing tyre-pressure roulette mid-ride.
🛠 Muc-Off Tubeless Repair Capsule
Muc-Off Tubeless Repair Kit
Running tubeless? Then this is non-negotiable. Packed into a slim, pink alloy capsule (easy to find in your pack), this kit includes everything you need to plug a hole fast and get rolling again. No faff, no mess — just rapid tubeless repair done right.
🛞 Pirelli Cinturato Smartube Inner Tube
Pirelli Cinturato Reinforced Tube
Even if you’re running tubeless, having a spare tube is smart — and this one’s built for the gravel life. The Smartube is reinforced, super light, and rolls up small. Perfect as a just-in-case backup without weighing you down.
💧 Top-Up Chain Lube/Wax
Waxing your chain might seem like a faff at first, but trust us – it’s worth it. A properly waxed chain runs cleaner, quieter, and lasts longer. Plus, it sheds off grime instead of collecting it, which is perfect for the dusty, gritty world of gravel.
For top-ups on the go, it depends on what system you’re running:
- If you’re using a waxed chain, pack something like Squirt Chain Lube (15ml). It’s a wax-based emulsion that plays nicely with your existing wax – ideal if things start sounding crunchy halfway through a ride.
- If you’re running a traditional lube setup, Peaty’s LinkLube Dry (15ml) is a great pick. It’s designed for dry conditions and keeps your drivetrain smooth without attracting tons of dust.
⚠️ Note: Don’t mix and match. If you wax your chain, do not top it up with regular lube — you’ll have to completely strip and re-clean it before you can wax again. Always stick to what’s already on your chain.
Gravel riding isn’t just a trend — it’s a whole new way to experience cycling. It strips things back to what riding’s all about: adventure, freedom, and fun (with a bit of tyre pressure chat thrown in for good measure).
Yes, it’s a bit different from road – looser surfaces, chunkier kit, and a whole new set of skills to pick up. But that’s what makes it exciting. With the right mindset, a few essential tools, and a half-decent sense of direction (or a GPS to fake it), you’ll be well on your way.
So go on – get out there, take a wrong turn, ride some questionable terrain, and come back with a story. That’s gravel.