

Getting the right size of bike ensures you get the most from your bicycle. There are plenty of small adjustments that can be made to the saddle height and position and handlebars, but getting the frame size correct will give you a solid foundation and a comfortable ride.
Our Quick Reference Bike Sizing Guides
Select a type of bike to view our recommendations based on your height – these will give you a great starting point regardless of brand:
Our Detailed Guide to Bike Sizing
Getting the correct size bike will ensure you get the best from your bicycle and be able to ride efficiently and in comfort, whether it’s a ride in the park or something much more competitive.
If you are visiting us in-store one of our team will be happy to assess you for the correct size and allow you to try a few bikes out for size, as sizing varies between brands, types of bikes and even models of bicycle. If you want to buy a bicycle online, then the following guide is the same principles we work with when sizing you up in-store…
BEFORE YOU START – The Key things to consider to WIN at getting the correct size bicycle
Get the frame size correct
The frame is what everything else hangs off of, so getting that piece of the jigsaw correct is most important, not what colour it is, the price, or the number of gears – all of that comes later.
Get the fit correct for YOUR riding
There is no point in getting a bike with a frame size and design that is optimised for winning The Tour de France when you are looking to pop around the local park and get fit. You can always make the fit more aggressive later by changing parts like the stem, seat post and handlebars. But to begin with, be honest about the level and type of riding you are doing today, and buy accordingly – spending more money does NOT ensure a better fit!
Consider ease of adjustment
Everyone is different, so once you have the frame size correct, it’s nice to be able to fine-tune the fit by adjusting the seat-post height, saddle position and handlebar position. Some models of bikes have an easy adjustment of these areas, some may require a hex key or two to make these adjustments. So if you are not a wizard with the spanners, look out for quick release seat clamps, adjustable angle stems, and a riser handlebar, which will have a rise that allows you to adjust the position relatively easily and quickly.
1) Which type of bicycle are you after?
Road bikes as the name implies are for road use. There are a growing number of “gravel” or “adventure” bikes that are based on road bicycles but feature wider and more versatile tyres and disc brakes, so you can also do light trail riding such as towpaths. They are also more pothole resistant! Sizing is normally in cm and is a measurement from the centre of the chain wheel axle (The BB or bottom bracket) and the top of the frame seat tube. Some are measured to the centre of the seat tube where it meets the top tube (otherwise known as the crossbar). That measurement is on road bikes normally in CM – and no one really knows why! Some road bikes will use “T-Shirt Sizing” so S, M, L, XL etc. but there will be a geometry chart that then shows the measurement in CM.
Mountain Bikes tend to use the T-Shirt sizing of S, M, L etc. or will have the seat tube measurement in INCHES. Why mountain bikes are inches and road bikes are CM who knows, but the part of the frame being measured is the same.
As a rule of thumb, if you can identify your size as Medium on one brand, you should use that as a starting point on another brand too. So if you already own a medium mountain bike for example and are comfortable with the sizing, start there.
Hybrid bikes as the name suggests are a blend of a road bike and a mountain bike. The fit is a little more precise than a mountain bike, and a little less than a road bike, so you do see a mixture of t-shirt style sizing and measurements in CM and INCHES too. The fit will be more relaxed than a classic road bike though and is designed to be a little more forgiving and upright.
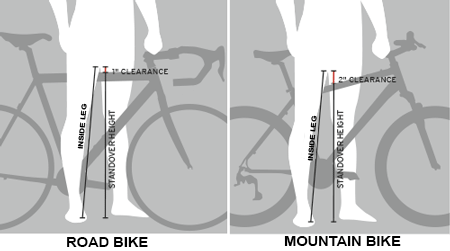
2) It’s all about the clearance. So how much clearance do you need?
To get the bicycle size correct, the stand-over height is the key measurement. This is the height of the top tube (crossbar) and then allows you to add some space for clearance so that if you need to stop in a hurry you have room not to injure yourself against the frame! For a road bike the top tube is normally fairly horizontal or has a slight slope, and we only need around 3cm or 1” of clearance. On a mountain bike or hybrid, this top tube will be sloping more in most cases as you may need to dismount whilst on a climb, so need more clearance. You should look for around 2” or 50mm of clearance between the top tube and your crotch. For a commuting or “fast” hybrid you can use the road bicycle rule of 1” of clearance:
3) How do I measure my inside or inseam for a bicycle?
To measure your inseam which then allows you to refer to the step-over height and add the gap you need, we find this is the best method – and often use it in store for bike fittings too:
1) Put the shoes you will normally be cycling in on
2) Grab a hardback book or chopping board from the kitchen and a pencil
3) Stand against a wall nice and upright and flat against the wall
4) Straddle your book or chopping board, and push up as if you were sitting on it like a saddle
5) Use that pencil (Doh! Go and get it if you forgot it and go back a couple of steps!) and mark the top of the book or block on the wall
6) Step away and repeat the process a couple of times to check the measurement
7) Measure from the floor – that is your inseam measurement
8) Clean the pencil mark off the wall before you get into trouble. And if you used a permanent pen then you ARE in trouble
Now you have your inseam measurement, you can look up the stand-over height for the bicycle you are interested in. We have the geometry charts for most bikes on our website that have this information, and the manufacturer’s website will contain this too. Simply add the clearance for either a road bike (1”), mountain bike (1”) or hybrid (1”-2”) for a given size of bicycle on the geometry chart, and check your inseam is that measurement or just a little over.
What about children’s bike sizing?
You don’t want to make the mistake of buying a bicycle that is too big so they “grow into it” as it can be quite unsafe! We sell specific children’s bikes such as Frog Bikes that have plenty of adjustments to allow the bike to grow with the rider, but the key thing is that they are in control for safety, and comfortable so they get the bike-riding bug!
The method is the same as above for an adult’s bike – measure your child’s inseam using the book and pencil trick. Then look at the information for the bicycle on our website and/or geometry chart and add around 2”-4” of clearance. Many brands such as Frog Bikes give an age indicator but we still suggest checking the inseam if possible as children grow at different rates, and come in all shapes and sizes!